Sending automated emails in Gmail is easier than you think. It can save you time and keep your communication organized.
Emails are a huge part of our daily routine. Manually sending each one can be time-consuming. Thankfully, automation helps. With Gmail, you can set up automated emails quickly. This is perfect for sending reminders, updates, or confirmations. You don’t need to be a tech expert to do it.
Gmail offers tools and features that are user-friendly. In this guide, you’ll learn how to set up automated emails step-by-step. This will streamline your email tasks and boost your productivity. Let’s dive in and simplify your email workflow.
Setting Up Gmail
Sending automated emails in Gmail can save you time and effort. Before you start, you need to set up Gmail. Here, we will guide you through the simple steps to create a Gmail account and configure it for automated emails. Once your account is set up, you can explore various automated email sending techniques to enhance your productivity. These techniques will allow you to schedule emails, create templates, and set up auto-responses. With these tools at your disposal, managing your email communications will become much more efficient.
Creating A Gmail Account
Follow these steps to create a Gmail account:
- Go to the Gmail website.
- Click on “Create account”.
- Fill in your personal information.
- Choose a unique username and password.
- Agree to the terms and click “Next”.
- Verify your phone number.
You now have a new Gmail account. Next, we will configure the settings for automation.
Configuring Gmail Settings
Configuring your Gmail settings is crucial for sending automated emails. Follow these steps:
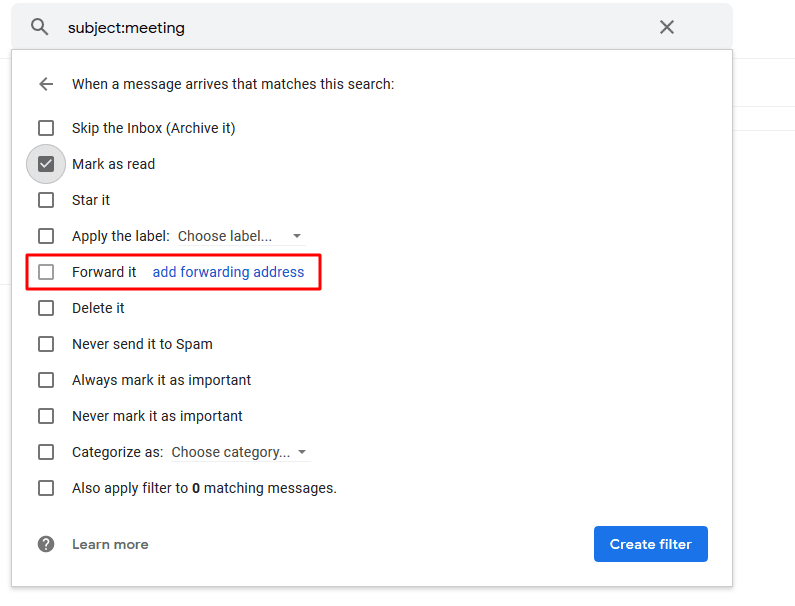
- Open Gmail and click on the gear icon (Settings).
- Go to “See all settings”.
- Navigate to the “Forwarding and POP/IMAP” tab.
- Enable IMAP and save changes.
Enabling IMAP allows other applications to access your Gmail. Now, you are ready to send automated emails.
Credit: digitalinspiration.com
Using Google Scripts
Automating emails in Gmail can save time. Using Google Scripts is an efficient way to do this. Google Scripts let you create custom functions and automate tasks. No advanced coding skills needed. This section will guide you through accessing and creating scripts.
Accessing Google Scripts
Accessing Google Scripts is straightforward. Open your Gmail account. Click on the Google Apps icon. This icon is usually found in the top-right corner. From the menu, select “Drive”.
Once in Google Drive, click on the “New” button. Choose “More” and then select “Google Apps Script”. This will open a new tab with the script editor. You are now ready to create your script.
Creating A New Script
Creating a new script involves writing the code. In the script editor, delete any text in the file. Now, you can write or paste your script code. A simple script can send an email automatically.
For example, you can use the following code:
function sendEmail() {
  MailApp.sendEmail("recipient@example.com", "Subject", "Email body");
}
Replace “recipient@example.com” with the recipient’s email address. Change “Subject” and “Email body” with your content. Save your script by clicking on the floppy disk icon.
To run your script, click the play button. You may need to authorize the script to access your Gmail. Follow the prompts to grant permission. Your automated email will be sent.
Writing The Email Script
Creating an automated email in Gmail involves writing an effective email script. The script is the core of your automated message. It ensures that your email communicates the intended message clearly and professionally. Let’s break down the process into easy steps.
Basic Script Structure
Every email script should have a clear structure. This helps the recipient understand your message quickly.
- Greeting: Start with a polite greeting. Use the recipient’s name if possible.
- Introduction: Briefly introduce yourself or your company.
- Main Message: State the purpose of your email clearly. Keep this section concise.
- Call to Action: Mention what you want the recipient to do next.
- Closing: End with a polite closing statement.
Here is a simple template:
Dear [Recipient's Name],

I hope this message finds you well. My name is [Your Name], and I am writing to you regarding [Subject].

[Main Message]

Please let me know if you have any questions or need further information.

Best regards,
[Your Name]
Customizing The Email Content
Customizing your email content can make your automated messages more effective.
- Personalization: Use the recipient’s name and specific details about them.
- Relevance: Ensure the content is relevant to the recipient’s interests or needs.
- Clarity: Write in short, clear sentences. Avoid jargon or complex words.
Consider the following tips:
- Use a friendly tone. It makes your email more engaging.
- Include a specific call to action. Tell the recipient exactly what to do next.
- Proofread your email. Check for spelling and grammar errors.
Here is an example of a customized email script:
Dear John,

I hope you are having a great day. My name is Sarah from ABC Company. We noticed you recently visited our website.

We would love to hear your feedback on our new product line.

Please reply to this email with your thoughts or any questions you may have.

Thank you for your time.

Best regards,
Sarah
Testing Your Script
After writing your automated email script in Gmail, the next crucial step is testing it. This ensures that everything runs smoothly and that there are no errors that could disrupt your email automation process. Testing is essential to verify that your script performs as expected.
Running The Script
To begin testing, run your script within the Google Apps Script editor. Click the run button, which looks like a play icon. This will execute your script and send a test email to your Gmail account. Make sure to use a test email address to avoid sending unintended emails to your contacts.
Checking For Errors
Once the script runs, check for any errors. The script editor will display error messages if there are issues. These errors might include syntax errors, missing variables, or incorrect email addresses. Fix any errors and run the script again. Repeat this process until the script runs without errors.
After confirming there are no errors, check your test email inbox. Ensure the automated email has been received and that it looks correct. Verify that all dynamic fields, such as recipient names or dates, are populated accurately.
Testing your script thoroughly is key to a successful email automation process. By running the script and checking for errors, you can ensure your emails are sent correctly and efficiently.
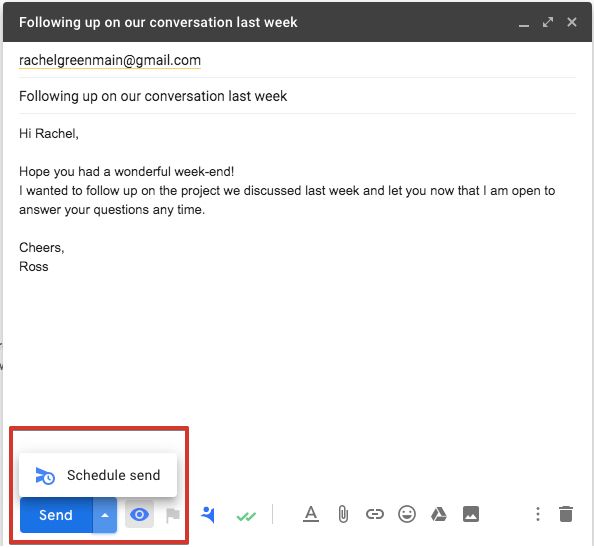
Scheduling The Email
Scheduling an email in Gmail can save you time and ensure that your message reaches the recipient at the right moment. Whether it’s a birthday wish, a reminder, or a work-related email, scheduling allows you to automate the sending process. This way, you can focus on other important tasks while Gmail takes care of the rest.
Setting Triggers
To start scheduling your email, you need to set up triggers. Triggers are the conditions that determine when your email will be sent. In Gmail, this is done by selecting the “Schedule send” option.
- Compose your email as you normally would.
- Click the arrow next to the “Send” button.
- Select “Schedule send” from the dropdown menu.
This will open a calendar where you can set the date and time for your email to be sent. Choose a time that aligns with the recipient’s timezone and availability to ensure your email is read promptly.
Choosing Time Intervals
After setting the trigger, you will need to choose the time intervals for sending your email. Gmail allows you to pick a specific date and time, but you can also set recurring intervals for regular emails.
- Daily: Ideal for reminders or daily updates.
- Weekly: Suitable for weekly reports or newsletters.
- Monthly: Perfect for monthly statements or summaries.
For one-time emails, simply select the exact date and time. For recurring emails, you might need third-party tools like Google Scripts. Here’s a basic script example:
function sendEmail() {
  var emailAddress = "recipient@example.com";
  var subject = "Scheduled Email";
  var message = "This is a test email.";
  MailApp.sendEmail(emailAddress, subject, message);
}
Set the trigger in Google Scripts to run the function at your desired interval. This way, you can automate the process even further and ensure your emails are always sent on time.
Monitoring And Managing
Monitoring and managing your automated emails in Gmail is crucial. It helps you ensure your messages reach the intended recipients. This will also help you improve your email strategy over time. Here is how you can track sent emails and make adjustments.
Tracking Sent Emails
Tracking your sent emails can give you insights into your email performance. Gmail does not have built-in email tracking. You can use third-party tools like Mailtrack. These tools help you see if your email was opened and how many times.
Another way to track your emails is by using Google Analytics. You can add UTM parameters to the links in your emails. This will help you see which emails drive traffic to your website.
Here is a simple code example to add UTM parameters to your links:
Your Link
This code will help you track the source, medium, and campaign in Google Analytics.
Making Adjustments
Once you have tracked your sent emails, you may need to make adjustments. Look at the data to see which emails performed well and which did not. Adjust your subject lines, content, and sending times based on this data.
You can also use A/B testing to find the best email strategies. Send two different versions of your email to a small group of recipients. See which one performs better, and then send the winning email to the rest of your list.
Here is a simple table to help you keep track of your adjustments:
| Email Element | Original | Adjusted | Outcome |
|---|---|---|---|
| Subject Line | Newsletter Update | Latest News Inside | Increased Open Rates |
| Send Time | 9 AM | 3 PM | Higher Click-Through Rates |
Regularly review and adjust your email strategy to keep improving your results.
Troubleshooting
Sending automated emails in Gmail can be very helpful. But sometimes, things don’t go as planned. You might face some issues. This section will help you troubleshoot these problems. Read on to learn how to fix common issues. Also, find out when to seek support.
Common Issues
One common issue is emails not sending at the scheduled time. Make sure your internet connection is stable. Check your Gmail settings to confirm everything is correct. Another problem is emails going to spam. To avoid this, ensure your content is not flagged as spam. Use clear subject lines and avoid too many links.
Sometimes, attachments might not send properly. Make sure the file size is within Gmail’s limit. Try compressing large files before attaching them. If your automated email is not sending at all, check your script or software. Ensure it has the right permissions. Test it with a simple email first.
Seeking Support
If you can’t resolve the issue, seek support. Visit the Gmail Help Center. They have many articles and guides. You can also join Gmail forums. Here, you can ask questions and get advice from other users. If you use a third-party tool, contact their support team. They might have specific solutions for your issue.
Remember, troubleshooting can take time. Be patient and methodical. Document any changes you make. This will help if you need to explain the issue to support staff.
Credit: www.rightinbox.com
Credit: nethunt.com
Frequently Asked Questions
How Can I Automate Emails In Gmail?
To automate emails in Gmail, use the “Scheduled Send” feature. Compose your email, click the arrow next to the “Send” button, and choose “Schedule send. ” Select your preferred date and time.
Is It Possible To Set Up Automated Replies In Gmail?
Yes, you can set up automated replies in Gmail using the “Vacation Responder” feature. Go to Settings, enable Vacation Responder, and set your custom message.
Can I Use Gmail For Email Marketing Automation?
Gmail itself isn’t designed for email marketing automation. However, you can use third-party tools like Mailchimp or Sendinblue to integrate with Gmail for email marketing automation.
How Do I Create An Email Template In Gmail?
To create an email template in Gmail, compose your email, click on the three dots at the bottom right, and select “Templates. ” Save your email as a new template for future use.
Conclusion
Sending automated emails in Gmail is simple and effective. Follow these steps to streamline your email tasks. Automation saves time and ensures consistency. Practice regularly to improve your skills. Soon, you will handle automated emails with ease. Remember, practice makes perfect.
Stay organized and efficient. Happy emailing!