Automating emails in Gmail saves time and boosts productivity. Imagine never missing an important follow-up or forgetting to send a thank-you note.
This guide explains how to automate emails in Gmail effectively. Email automation helps streamline repetitive tasks. With Gmail, you can set up automatic replies, schedule emails, and create filters to organize your inbox. Whether you’re managing business communications or personal emails, automation tools can make your life easier.
By the end of this guide, you’ll know how to harness Gmail’s features to handle emails efficiently. Let’s dive in and explore the steps to automate your Gmail experience, ensuring you stay on top of your email game.
Credit: www.rightinbox.com
Introduction To Email Automation
In today’s digital age, email automation is a powerful tool. It helps streamline communication. By automating emails, you save time and effort. Gmail offers several features to automate your emails. This guide will introduce you to email automation in Gmail. You’ll learn its benefits and common use cases. With the automated email setup in Gmail, you can create templates for recurring messages, ensuring consistency and professionalism in your correspondence. Additionally, you can target specific audiences with personalized messages at scale, enhancing engagement and response rates. Embracing these automation techniques can significantly improve your workflow and productivity. By implementing automation, you can ensure timely responses and maintain consistent communication with your audience. Automating your email workflow allows you to focus on more strategic tasks while your emails are sent automatically based on triggers you set. This not only enhances productivity but also improves overall engagement with your recipients.
Benefits Of Automation
Automating your emails in Gmail has many benefits. Here are some key advantages:
- Time-saving: Automation handles repetitive tasks. You can focus on more important work.
- Consistency: Automated emails ensure consistent messaging. No more errors or forgotten emails.
- Efficiency: Respond faster to inquiries. Keep your audience engaged.
- Personalization: Use templates to personalize messages. Make each recipient feel special.
Common Use Cases
Email automation can be used in many scenarios. Here are some common use cases:
- Welcome Emails: Send a warm welcome to new subscribers.
- Follow-up Emails: Schedule follow-ups after meetings or events.
- Reminder Emails: Automate reminders for appointments or deadlines.
- Birthday Greetings: Send personalized birthday wishes. Show you care.
- Promotional Emails: Announce new products or sales. Boost engagement.
Email automation in Gmail is easy and effective. It brings many benefits to your workflow. Start automating today to save time and improve communication.
Setting Up Filters
Setting up filters in Gmail can help you manage your inbox efficiently. Filters allow you to automatically sort incoming emails based on specific criteria. This guide will walk you through creating and managing filters in Gmail.
Creating Filters
Follow these steps to create filters in Gmail:
- Open Gmail and click the gear icon (Settings) in the top right corner.
- Select See all settings from the dropdown menu.
- Go to the Filters and Blocked Addresses tab.
- Click on Create a new filter.
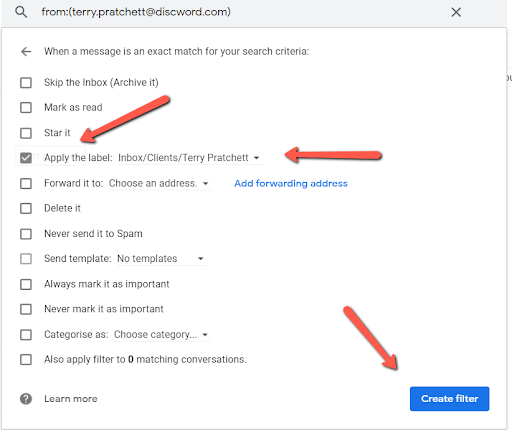
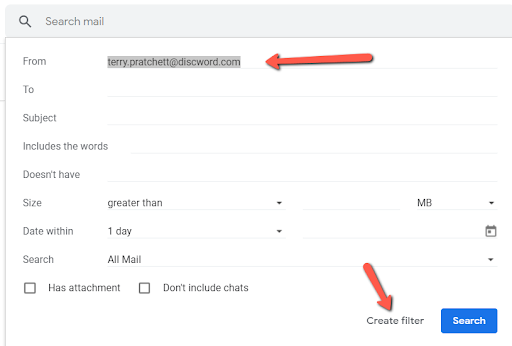
- A dialog box will appear. Enter your filter criteria:
| Field | Description |
|---|---|
| From | Filter emails from specific senders. |
| To | Filter emails sent to specific recipients. |
| Subject | Filter emails with specific subject lines. |
| Has the words | Filter emails containing specific words. |
| Doesn’t have | Filter emails that do not contain specific words. |
| Size | Filter emails by size. |
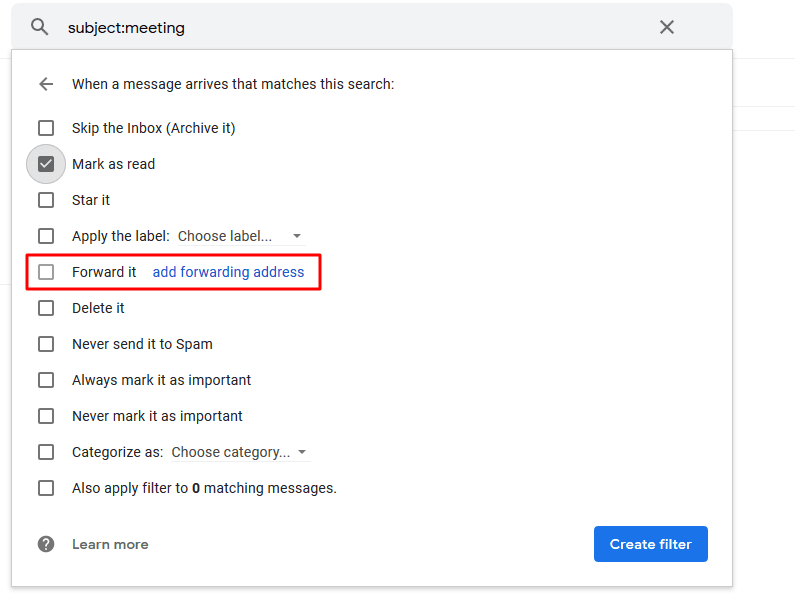
After entering your criteria, click Create filter. Choose the actions you want the filter to perform, such as:
- Skip the Inbox (Archive it)
- Mark as read
- Star it
- Apply the label: Choose a label
- Delete it
- Never send it to Spam
- Always mark it as important
- Never mark it as important
Click Create filter to save your settings.
Managing Filters
To manage your filters, follow these steps:
- Open Gmail and click the gear icon (Settings) in the top right corner.
- Select See all settings from the dropdown menu.
- Go to the Filters and Blocked Addresses tab.
- You’ll see a list of your existing filters.
From here, you can:
- Edit a filter: Click edit next to the filter.
- Delete a filter: Click delete next to the filter.
By setting up and managing filters, you can keep your inbox organized. This saves you time and ensures important emails are never missed.
Using Gmail Templates
Using Gmail Templates can significantly streamline your email communication. Templates save time and effort, especially for repetitive emails. They ensure consistency and efficiency in your email responses. Let’s explore how to create and use Gmail templates effectively.
Creating Templates
Creating templates in Gmail is straightforward. Follow these steps:
- Open Gmail and click on the gear icon to access Settings.
- Select See all settings from the dropdown menu.
- Navigate to the Advanced tab and enable Templates.
- Click Save Changes at the bottom of the page.
- Compose a new email and write your desired template text.
- Click on the three dots at the bottom-right corner of the compose window.
- Hover over Templates, then click Save draft as template.
- Select Save as new template and name your template.
Using Templates In Emails
Using Gmail templates in emails is a breeze. Here’s how:
- Compose a new email or open an existing draft.
- Click on the three dots at the bottom-right corner of the compose window.
- Hover over Templates and choose the template you want to use.
- The template text will populate the email body. You can edit it as needed before sending.
Gmail templates are a powerful tool for efficiency. They save time and ensure consistent communication. Start creating your templates today to enhance your email workflow.
Credit: www.rightinbox.com
Scheduling Emails
Scheduling emails in Gmail can save you time and effort. It allows you to send emails at a later date and time. This feature ensures your emails reach recipients at the perfect moment. In this blog post, we will explore how to schedule emails in Gmail effectively. We will also discuss best practices to follow for scheduling emails.
Using Gmail’s Schedule Send
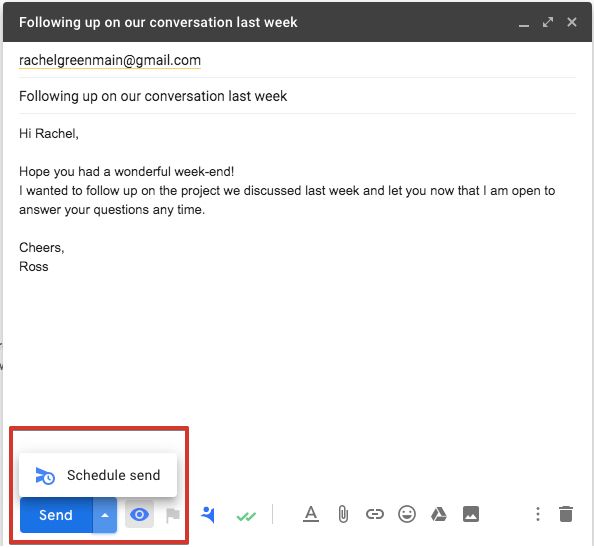
Gmail offers a built-in feature called “Schedule Send.” This tool makes scheduling emails easy. To use it, start by composing your email. Once your email is ready, click the arrow next to the “Send” button. A menu will appear with the “Schedule Send” option.
Click on “Schedule Send.” A window will pop up with several predefined dates and times. Choose one of these options, or select “Pick date & time” to set a custom schedule. Confirm your choice, and your email will be scheduled. You can always view your scheduled emails in the “Scheduled” folder.
Best Practices For Scheduling
Scheduling emails can be very effective if done right. Here are some best practices to follow. First, consider the recipient’s time zone. Sending an email at an inconvenient time may lead to it being ignored. Aim to schedule emails during business hours.
Second, avoid scheduling emails too far in advance. Circumstances can change, making your email irrelevant. Keep your scheduled emails within a week from the current date.
Lastly, always review your email before scheduling it. Double-check for any errors or missing information. A well-crafted email reflects professionalism and increases the chances of a positive response.
Integrating Third-party Tools
Automating emails in Gmail can save time and increase productivity. One effective way is by using third-party tools. These tools offer advanced features and customization options. They can simplify your email tasks. In this section, we explore how to integrate these tools with Gmail.
Popular Tools
There are several popular third-party tools available. Each has unique features that can enhance your email automation. Here are some of the most commonly used ones:
- MailChimp: Ideal for managing email campaigns and newsletters.
- Zapier: Connects Gmail to other apps for seamless automation.
- IFTTT: Creates simple automation rules based on triggers.
- Gmass: Great for sending mass emails and tracking responses.
Connecting Tools To Gmail
Connecting third-party tools to Gmail is straightforward. Follow these steps to get started:
- Choose a tool from the list above.
- Visit the tool’s website and sign up for an account.
- Navigate to the integration or settings page.
- Select Gmail from the list of available apps.
- Follow the prompts to authorize the connection.
- Customize your settings and automation rules.
Each tool may have a slightly different process. Detailed instructions are usually available on the tool’s website. Ensure you grant the necessary permissions for seamless integration.
Once connected, you can start automating your emails. For example, set up automatic replies, schedule future emails, or create complex workflows. These tools can significantly streamline your email management.
Automating Follow-ups
Automating follow-ups in Gmail can save time and boost productivity. It’s a smart way to ensure no important emails slip through the cracks. With the right tools and settings, you can manage your email like a pro. Let’s dive into some useful techniques.
Setting Up Follow-up Reminders
Follow-up reminders help you stay on top of your email game. They ensure you never miss responding to important emails.
To set up a reminder, use Gmail’s built-in features. Open an email and click the clock icon. Choose a time and date for the reminder. Gmail will notify you when it’s time to follow up. Simple, right?
You can also mark emails as important. Click the star icon next to the email. This makes it easier to spot later. Use labels to organize your emails. Create a label called “Follow-Up”. Move relevant emails to this label. This keeps your inbox tidy and organized.
Using Boomerang For Gmail
Boomerang is a powerful tool for email automation. It lets you schedule emails to be sent later. You can also set reminders to follow up if you don’t get a reply.
First, install the Boomerang extension for your browser. Once installed, open Gmail. You will see the Boomerang icon in your email composer. Click the icon to schedule your email. Choose the date and time you want it sent.
To set a follow-up reminder, click “Remind me if no reply”. Choose the time frame for the reminder. Boomerang will notify you if you don’t get a response. This ensures you never miss a follow-up.
Boomerang also offers recurring email options. Use this for regular follow-ups. Set the frequency, and Boomerang will handle the rest. This tool makes managing follow-ups a breeze.
Leveraging Gmail Add-ons
Leveraging Gmail add-ons can simplify the process of automating emails. Add-ons extend Gmail’s functionality, allowing users to perform tasks directly within their inbox. They offer various features, from scheduling emails to managing contacts. Understanding how to use these add-ons can save time and enhance productivity. Let’s explore some useful add-ons and how to install them.
Useful Add-ons
Several Gmail add-ons can help with email automation. One popular option is Boomerang. It allows users to schedule emails and set reminders. Another useful add-on is Mailtrack. It lets you know when recipients open your emails. Both add-ons integrate seamlessly with Gmail.
Yet another useful add-on is Gmelius. It offers email tracking, scheduling, and even collaborative tools. Gmelius can transform your Gmail into a powerful productivity suite. There are many more add-ons available. Each one caters to different needs and preferences.
Installing Add-ons
Installing add-ons in Gmail is straightforward. First, open Gmail in your web browser. Look for the gear icon in the upper right corner. Click on it and select “Get add-ons” from the dropdown menu.
A new window will open, displaying various add-ons. Use the search bar to find the add-on you need. Click on the add-on, then click the “Install” button. Follow the prompts to complete the installation.
Once installed, the add-on will appear in your Gmail interface. You can access its features directly from your inbox. Repeat this process for any other add-ons you wish to install.
Credit: nethunt.com
Maintaining Email Security
Automating emails in Gmail can save time and ensure important messages get sent. Yet, it is crucial to maintain email security. This ensures your data and recipients’ information stay safe. Let’s explore some best security practices and common pitfalls to avoid.
Best Security Practices
Maintaining email security involves several best practices. Here are key steps:
- Use Strong Passwords: Create passwords with a mix of letters, numbers, and symbols.
- Enable Two-Factor Authentication: Add an extra layer of security with two-factor authentication (2FA).
- Regularly Update Software: Ensure your Gmail and any related software are up-to-date.
- Monitor Account Activity: Regularly check for any suspicious activity in your account settings.
Avoiding Common Pitfalls
Even with the best practices, common pitfalls can compromise your email security. Here are some to avoid:
- Clicking on Suspicious Links: Be wary of links in emails from unknown senders.
- Sharing Personal Information: Never share sensitive information like passwords over email.
- Ignoring Security Alerts: Pay attention to alerts from Gmail about suspicious activity.
- Reusing Passwords: Avoid using the same password across multiple sites or services.
Following these guidelines helps ensure your automated emails in Gmail remain secure.
Frequently Asked Questions
How Do I Automate Emails In Gmail?
To automate emails in Gmail, use filters and labels. Create a filter based on your criteria. Then, apply labels or actions like forwarding or archiving.
Can I Schedule Emails In Gmail?
Yes, you can schedule emails in Gmail. Compose your email, then click the arrow next to the Send button. Select “Schedule send” and choose your preferred date and time.
What Tools Help Automate Gmail?
Tools like Google Sheets, Zapier, and IFTTT help automate Gmail tasks. These tools can automate various actions like sending emails, creating tasks, and managing contacts.
Is Gmail Automation Free?
Basic Gmail automation features like filters and scheduling are free. Some advanced automation tools may require a paid subscription for full functionality.
Conclusion
Automating emails in Gmail saves time and boosts productivity. Set up filters and templates. Use Google Scripts for advanced tasks. Consistent automation keeps your inbox organized. Try it today and see the difference. Simple steps lead to big changes. Happy emailing!