Sending a Pages document via email is simple. You can do it in a few steps.
Pages is a word processing app by Apple. It’s popular for creating documents on Mac and iOS devices. Sometimes, you need to share these documents through email. Whether for work, school, or personal use, emailing a Pages document is common.
In this guide, you will learn how to send a Pages document via email. This method ensures your document reaches the recipient quickly and in the right format. Let’s get started with the steps to make this task easy and efficient.

Credit: ampler.io
Preparing The Document
Sending a Pages document via email is a straightforward task, but preparing the document correctly is key to ensuring it looks professional and communicates your message effectively. This process involves a few simple steps, which we will break down for you. Let’s dive into the first two steps: opening your Pages document and editing the content.
Open Pages
First, open the Pages application on your Mac. If you are like me, you might have several applications open at once. Ensure you have a clutter-free workspace by closing any unnecessary windows. This will help you focus solely on your document.
Once Pages is open, locate your document. If it’s not already listed under your recent files, use the ‘Open’ option under the ‘File’ menu to navigate to where your document is saved. Click on the document to open it.
Edit Content
Now that your document is open, review the content thoroughly. Ensure there are no typos or grammatical errors. It’s always a good idea to read through it a couple of times.
Check the formatting. Make sure the headings, paragraphs, and bullet points are consistent and clear. If you are including images or tables, make sure they are properly aligned and not pixelated.
Think about your audience. What do they need to know? What will grab their attention? Tailor your content accordingly. If you’re sending this to a colleague, for example, you might want to highlight key points or include a brief summary at the beginning.
Finally, save your changes. You can do this by clicking ‘File’ and then ‘Save’, or simply use the shortcut Command + S. By saving frequently, you ensure you don’t lose any of your hard work.
Have you ever sent a document without checking it first and regretted it later? Taking these extra steps can save you from that embarrassment. What steps do you take to ensure your documents are polished before sending them? Share your tips in the comments below!
Saving The Document
Before you can send your Pages document via email, you need to save it properly. This means choosing the right export options and file formats. Doing this ensures your recipient can open and read your document without any issues.
Export Options
Pages offers several export options to help you save your document in the best way possible. You can choose to export your document directly from the Pages app. Simply click on File in the menu bar, then select Export To.
From here, you have multiple options. You can export your document as a PDF, Word document, or even as a plain text file. Each option has its own benefits depending on the recipient’s needs.
File Formats
Choosing the right file format is crucial for ensuring your document is accessible. A PDF is great for maintaining the layout and design of your document. It’s a universal format that can be opened on almost any device.
If your recipient needs to edit the document, consider exporting as a Word document. This format is widely used and compatible with both Microsoft Word and Google Docs.
For simpler needs, exporting as a plain text file may be sufficient. This strips away formatting but ensures the text is easily readable and editable.
Have you ever sent a document only to find out the recipient couldn’t open it? It’s frustrating. By taking a few extra steps when saving your document, you can avoid this hassle. Which file format do you usually choose when sending documents?
Choosing Email Client
Easily send a Pages document via email by exporting it as a PDF or Word file first. Then, attach it to your email. This process ensures compatibility across different devices.
When sending a Pages document via email, choosing the right email client is crucial. Your email client can impact how easily you can attach and send files. It can also affect the recipient’s ability to open and view your document. Let’s dive into the popular choices and compatibility checks you should consider.Popular Choices
Most people use email clients like Gmail, Outlook, or Apple Mail. Each of these has its strengths.Gmail is widely used and integrates well with other Google services. It’s a solid choice if you’re already using Google Drive.Outlook is popular in professional settings. It’s part of the Microsoft Office Suite and works seamlessly with other Office apps.Apple Mail is perfect for Mac users. It’s already integrated into your system, making it super convenient.Compatibility Check
Before sending your Pages document, ensure it’s compatible with your email client.Gmail, Outlook, and Apple Mail can handle most document formats. However, Pages documents (.pages) might not be universally compatible. Consider exporting your document as a PDF or Word file to ensure it opens correctly on the recipient’s end.It’s also wise to send a test email to yourself. This helps you check if the attachment opens properly. It’s a quick step but can save you from potential issues later.Lastly, think about the recipient. Are they using a different email client? Make sure your document format works for them too.Choosing the right email client and ensuring compatibility can make sending your Pages document a breeze. Have you ever faced issues with document compatibility? Share your experiences and tips in the comments below!
Credit: help.pdf-pro.net
Attaching The Document
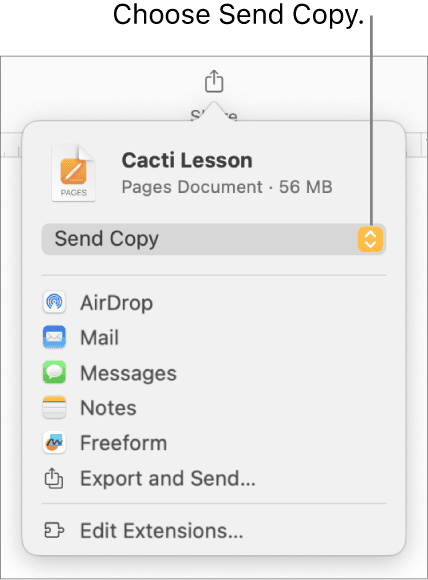
Sending a Pages document via email is simple. First, open the document in Pages. Then, click on the “Share” button and select “Send a Copy. ” Choose “Mail,” enter the recipient’s email address, and hit “Send. “
Sending a Pages document via email is a straightforward task, but it can sometimes be tricky if you’re not familiar with the steps. Attaching the document correctly ensures that your recipient can open and read it without any issues. This section will guide you through the process, focusing on composing your email and adding the attachment.Compose Email
Open your email application and click on the button to compose a new email. This button is often labeled as “New Email” or simply has a “+” symbol.In the new email window, fill in the recipient’s email address. Make sure it’s correct to avoid any bounce-backs.Write a clear subject line. For instance, you might use “Pages Document Attached” to let the recipient know what to expect.Type your message in the body of the email. Keep it brief and to the point. Mention that you have attached a Pages document for their review or information.Add Attachment
Look for the attachment icon in your email window. This is usually represented by a paperclip symbol.Click on the paperclip icon to open a file browser window. Navigate to the location where your Pages document is saved.Select the Pages document and click on “Open” or “Choose File” depending on your email client. This action attaches the document to your email.Double-check that the document has been attached. You should see the file name listed below the subject line or within the email body.Before hitting send, preview your email to ensure everything looks right. Is your message clear? Is the document correctly attached?Finally, click the “Send” button. Your email, along with the attached Pages document, will be on its way to the recipient.Remember, the easier you make it for your recipient to understand and access the document, the smoother the communication process will be. Have you ever struggled with attachments? Share your experience in the comments!Writing The Email
Sending a Pages document via email is straightforward, but crafting the email itself is crucial. This step ensures your recipient understands your message and receives the document properly. Let’s break down the key components of writing the email.
Subject Line
The subject line is the first thing your recipient sees. It should be clear and concise. Mention the document briefly. For example, “Attached: Project Report” or “Pages Document for Review”. This helps the recipient know what to expect.
Body Content
The body content is where you explain the purpose of the email. Start with a greeting. Use a friendly tone. For instance, “Hi [Recipient’s Name],” or “Hello [Recipient’s Name],”.
Next, introduce the document. Briefly explain its contents. For example, “Please find attached the project report for your review.” Or “Attached is the Pages document we discussed.” Make it clear why you are sending the document.
Provide any necessary instructions. If feedback is needed, mention it. For example, “Please review and let me know your thoughts.” Or “Kindly provide feedback by [date].” This helps the recipient understand the next steps.
End with a polite closing. For instance, “Thank you,” or “Best regards,” followed by your name. This ensures a respectful and professional tone.
Sending The Email
Once you have prepared your Pages document, the next step is sending it via email. This process involves a few simple steps to ensure your document reaches the recipient without issues. Follow these steps to send your Pages document through email efficiently.
Review Details
First, double-check the email details. Ensure the recipient’s email address is correct. Add a clear subject line, so the recipient knows what the email is about. A brief message in the email body can also be helpful. This message can introduce the document or provide any necessary context.
Click Send
After reviewing the details, attach your Pages document to the email. Look for the paperclip icon or “Attach File” button in your email client. Select your Pages document from your files. Confirm the attachment has uploaded correctly. Finally, click the “Send” button. Your email, along with the attached Pages document, will be on its way to the recipient.
Troubleshooting Issues
Learn how to send a Pages document through email easily. Open the document, click “Share,” then choose “Send a Copy. ” Select email, enter the recipient’s address, and hit send.
When sending a Pages document via email, you might face a few hiccups. These issues can be frustrating, but they’re usually easy to solve. Here are some common problems and their solutions to help you send that document smoothly.Attachment Problems
Sometimes, the Pages document may not attach to your email properly. This can happen for several reasons.First, check the file size. If the document is too large, it might exceed the email service’s attachment limit. Try compressing the file or using a file-sharing service.Another common issue is the file format. Ensure your document is in a compatible format like PDF or Word. Pages documents (.pages) are not always supported by all email services.If the problem persists, try renaming the file. Occasionally, special characters in the filename can cause errors. Use only letters and numbers to avoid this.Email Not Sent
Have you ever hit ‘send’ only to find out your email never reached its destination? This can be a real headache.First, verify your internet connection. A weak or unstable connection can prevent emails from sending. Restart your router or switch to a stronger network if necessary.Next, check your email settings. Sometimes, outgoing server settings need adjusting. Ensure you’re using the correct SMTP settings for your email provider.Also, don’t overlook your email’s spam filters. They might mistakenly block the outgoing message. Check your email’s outbox or drafts folder to see if the message is stuck there.Lastly, ensure your recipient’s email address is correct. A simple typo can send your email into the digital void.Have you ever faced these issues while trying to send a Pages document? What solutions worked for you? Share your experiences to help others navigate these common problems.
Credit: help.pdf-pro.net
Follow Up
Following up after sending a Pages document via email ensures effective communication. It shows professionalism and helps confirm that the recipient received the document. Here’s how to follow up efficiently.
Check For Responses
After sending your Pages document, check your email for responses. Monitor your inbox regularly. Look for any replies or acknowledgment from the recipient. This ensures that the document reached the right person. If you use an email client, enable notifications for quicker updates.
Resend If Necessary
If you do not receive a response within a reasonable time, consider resending the document. Sometimes emails get lost or overlooked. A polite follow-up email can help. Mention that you are resending the document to ensure it was received. Attach the Pages document again for convenience.
Frequently Asked Questions
How Do I Send A Pages Document In An Email?
Open the Pages document. Click the ‘Share’ button. Choose ‘Send a Copy’. Select ‘Mail’. Enter the recipient’s email and send.
How Do I Share A Pages Document?
Open the Pages document. Click on the share button. Choose sharing options like email or cloud services. Follow on-screen instructions.
How Do I Upload A Document From Pages?
Open Pages, select “File” then “Export To,” choose your desired format (PDF, Word, etc. ), and save the document. Then upload the saved file to your desired location.
How Do I Export A Document From Pages?
Open your document in Pages. Click File, then Export To. Choose the format (PDF, Word, etc. ). Save the exported file.
Conclusion
Sending a Pages document via email is easy. Follow the steps above. Convert your document to a compatible format. Open your email and attach the file. Ensure the recipient’s address is correct. Click send. That’s it! Your document is now on its way.
This method works for personal or professional emails. Practice a few times. Soon, it will become second nature. Happy emailing!