Finding the IP address of an email sender in Gmail is simple. You can do it in a few steps.
Understanding the sender’s IP address can help identify the source of an email. It can be useful for various reasons, such as tracking spam or verifying sender identity. In this guide, we will walk you through the steps to find the IP address of an email sender in Gmail.
This process involves checking the email headers, which contain crucial details about the email’s origin. By the end of this tutorial, you will be able to locate the sender’s IP address with ease. Let’s get started and uncover the mystery behind email headers in Gmail.

Credit: lindsworthdeer.wordpress.com
Introduction To Ip Addresses
Understanding IP addresses is essential for tracking email senders. IP addresses can reveal the sender’s location and other details. In Gmail, finding the sender’s IP address requires a few steps. But first, let’s understand what an IP address is and why it is important.
What Is An Ip Address
An IP address is a unique number assigned to every device. It allows devices to communicate with each other over the internet. Think of it as a digital address for your computer or smartphone. There are two main types of IP addresses: IPv4 and IPv6. IPv4 addresses are shorter, while IPv6 addresses are longer and more complex.
Importance Of Ip Addresses
IP addresses help identify and locate devices on a network. They are crucial for internet communication. Without IP addresses, sending and receiving data online would be impossible. In Gmail, knowing the sender’s IP address can help verify the sender’s identity. It can also detect possible spam or malicious emails.
Credit: yamm.com
Understanding Email Headers
Understanding email headers is crucial for finding the IP address of an email sender in Gmail. Email headers contain valuable information about the journey of an email. They reveal details about the sender, recipient, and path taken by the email. By decoding these headers, you can trace the origin of an email.
What Are Email Headers
Email headers are lines of metadata contained within an email. They store information about the email’s path. This includes the sender, recipient, and various servers it passed through. Headers also provide timestamps and security details. Each email has a header, but they are usually hidden by default. You need to access them manually to view the details.
How Email Headers Work
Email headers work like a digital footprint. Each time an email passes through a server, new information is added to the header. This information helps track the email’s route from sender to recipient. Headers include fields such as “From,” “To,” “Date,” and “Received.” They also contain technical details like IP addresses and server names. By examining these fields, you can determine the IP address of the email sender.
Accessing Gmail Email Headers
Accessing email headers in Gmail can reveal important information. They show the path an email takes. This includes the sender’s IP address. Knowing this can help you verify the email’s origin. This is useful for identifying spam or phishing attempts.
Steps To Open Email Headers
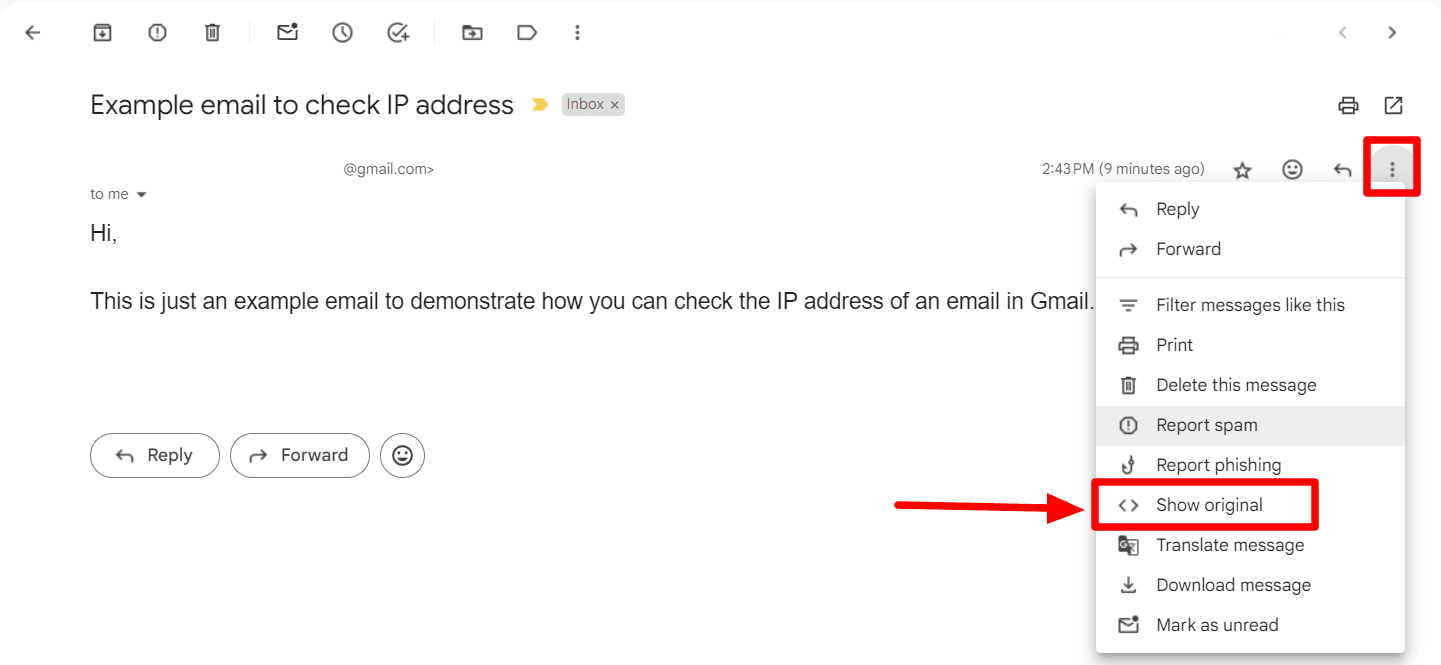
First, open Gmail and find the email. Click on it to open. Next, click the three vertical dots in the top right corner. Select “Show original” from the dropdown menu. A new tab will open with the email headers. Here, you can find detailed information about the email.
Tools For Viewing Headers
Several tools can help you view email headers. These tools make it easier to understand the data. One popular tool is Google’s own header analyzer. Copy the header data and paste it into the tool. It will display the information in a readable format. Another tool is MXToolbox. It also helps you analyze email headers.
Using these tools can save time. They simplify the process of reading and understanding email headers. You can find out if an email is genuine or not. This is important for your email security.
Locating The Ip Address In Email Headers
Finding the IP address of an email sender in Gmail is simple. Open the email, click on the three dots, then select “Show original” to view the email headers. Look for the “Received” line to find the sender’s IP address.
Finding the IP address of an email sender in Gmail can seem complex. But with the right steps, you can do it easily. The IP address is hidden in the email headers. These headers contain detailed information about the email.Key Sections To Look For
To locate the IP address, you need to find the email headers. Open the email in Gmail. Click on the three dots in the top right corner. Select “Show original.” This will display the email headers. Look for lines that start with “Received.”Identifying The Sender’s Ip
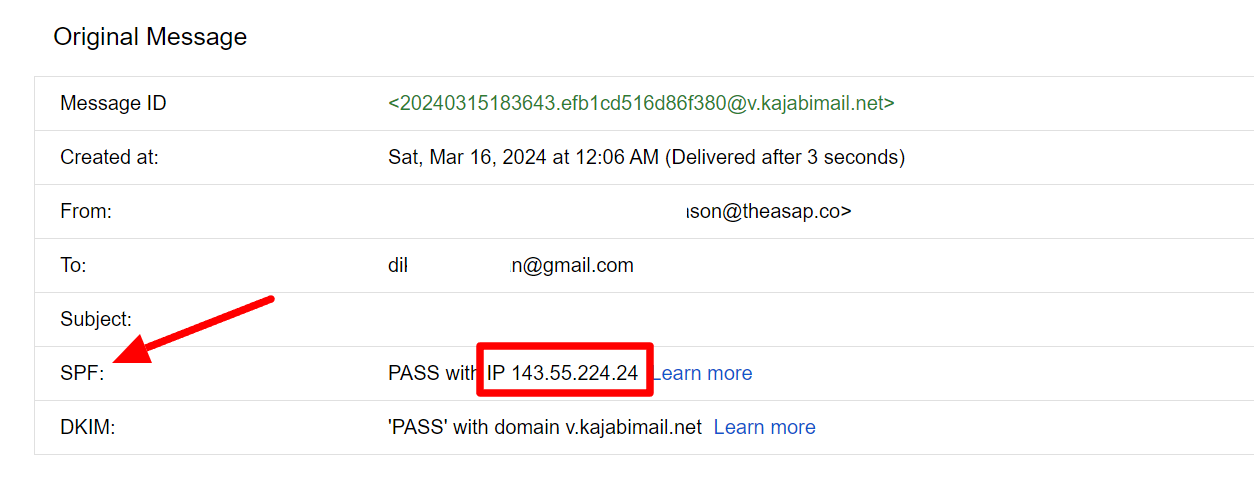
In the email headers, find the “Received” lines. These lines show the path of the email. The first “Received” line is the most important. It usually contains the sender’s IP address. Look for a number that looks like this: 192.168.1.1. This is the IP address you need.By following these steps, you can find the sender’s IP address. This information can help you track the origin of the email. It can be useful for various purposes, such as security and verification. “`Using Online Tools For Ip Lookup
Finding the IP address of an email sender in Gmail can seem tricky. But with the help of online tools, the process becomes much easier. These tools can quickly provide you with the IP address information you need. They are user-friendly and do not require any technical skills. Below, we will explore some popular IP lookup tools and show you how to use them.
Popular Ip Lookup Tools
Several online tools can help you find the IP address of an email sender. Some of the most popular tools include:
- IP-Tracker.org
- WhatIsMyIPAddress.com
- IP-Lookup.org
These tools are widely used and trusted by many. They offer easy-to-use interfaces and deliver accurate results.
How To Use Ip Lookup Tools
Using these tools is straightforward. Follow these simple steps:
- Open the email in Gmail.
- Click on the three dots in the top right corner of the email.
- Select “Show original” from the dropdown menu.
- Copy the header information that appears.
- Go to your chosen IP lookup tool.
- Paste the header information into the tool’s search bar.
- Click “Submit” or “Lookup”.
The tool will process the information and display the IP address of the sender. This method is quick and efficient, saving you time and effort.
Credit: superuser.com
Interpreting Ip Address Information
When you receive an email, the sender’s IP address can reveal useful information. Interpreting this data helps you understand where the email came from. This section will explain how to read and interpret IP address information effectively.
Geographical Data From Ip
The IP address can provide details about the sender’s location. Tools like IP lookup services can show the country, city, and even the postal code. This data can help verify the sender’s identity. If the email claims to be from a specific location, compare it with the IP data.
Understanding Isp Information
IP addresses also show which Internet Service Provider (ISP) the sender uses. This data can help trace the email’s origin. Knowing the ISP can add another layer of verification. If the email claims to be from a certain company, check if the ISP matches. This ensures the sender’s legitimacy.
Common Issues And Troubleshooting
Finding the IP address of an email sender in Gmail can be tricky. There are some common issues that users might face during this process. This section will cover some of the most frequent problems and how to troubleshoot them.
False Ip Addresses
Sometimes, the IP address you find may not be the correct one. This can happen due to various reasons:
- Proxy Servers: The sender might be using a proxy server. This hides their real IP address.
- Email Servers: The IP address could belong to the email server, not the sender.
To resolve this, you can:
- Look for the first “Received” header in the email.
- Check if the IP matches common proxy IPs.
- Use an IP lookup tool to verify the IP address.
Dealing With Obscured Headers
Gmail sometimes hides certain headers to protect user privacy. This can make finding the IP address more difficult.
To deal with obscured headers:
- Click on the three dots in the email.
- Select “Show original” to view all headers.
- Search for the “Received” header to find the sender’s IP address.
If the headers are still unclear:
- Use a header analysis tool.
- Copy and paste the header into the tool.
- Analyze the results for the sender’s IP address.
By following these steps, you can troubleshoot and find the correct IP address of the email sender in Gmail.
Security And Privacy Considerations
Finding the IP address of an email sender in Gmail can be useful. Yet, it’s important to consider security and privacy. Knowing how to handle this information responsibly is key. Protecting your own IP and using others’ IP information ethically are vital steps.
Protecting Your Own Ip
Your IP address can reveal your location and other personal details. Always protect your IP to maintain your privacy. Use tools like VPNs or proxy servers. These tools hide your real IP address from others. Be cautious when sharing your IP address online.
Check your Gmail settings for privacy options. Adjust these settings to enhance your security. Regularly update your software to prevent vulnerabilities. Stay aware of potential threats and protect your digital footprint.
Ethical Use Of Ip Information
Using someone else’s IP address requires responsibility. Respect their privacy and use the information ethically. Avoid using IP information for malicious purposes. Misuse can lead to legal consequences and harm.
Only use IP information for legitimate reasons. For example, identifying spam or phishing emails. Always ask for consent if you need to use someone’s IP data. Respecting privacy builds trust and ensures a safer online environment.
Frequently Asked Questions
How Can I Find The Ip Address In Gmail?
To find the IP address of the email sender in Gmail, open the email and click on “More”. Then select “Show original”. Look for the “Received” line in the email headers.
Is It Possible To Trace An Ip Address From Gmail?
Yes, you can trace an IP address from Gmail by viewing the email headers. Use “Show original” to access these details.
Can I See The Sender’s Ip Address In Gmail?
Yes, you can see the sender’s IP address by viewing the email headers. Click “Show original” to find it.
Why Can’t I Find The Ip Address In Gmail?
Gmail may hide the sender’s IP address for privacy. Check “Received” lines in the email headers to locate it.
Conclusion
Finding the IP address of an email sender in Gmail is straightforward. Follow the outlined steps to trace the sender’s information. Understanding this can help you identify spam or suspicious emails. Always stay aware of unknown emails for better online safety.
Use these tips to keep your inbox secure. Remember, a little knowledge goes a long way in protecting your digital life. Happy email checking!