WordPress is a popular tool for creating websites and blogs. One great feature is scheduling posts. This means you can set a post to publish at a later time. In this guide, we will show you how to do that.
Why Schedule a Post?
Scheduling posts can save you time. It helps you keep a regular posting schedule. This is good for your readers. They know when to expect new content. It also helps you manage your time better.
Steps to Schedule a Post in WordPress
Follow these steps to schedule your post:
1. Log Into WordPress
First, go to your WordPress login page. Enter your username and password. Click the “Log In” button. You will now be in the WordPress dashboard.
2. Create A New Post
In the dashboard, find the “Posts” menu. Click “Add New.” This will open the post editor.
3. Write Your Post
Write your post in the editor. Add a title and content. You can also add images or videos. Make sure everything looks good.
4. Set The Publish Date
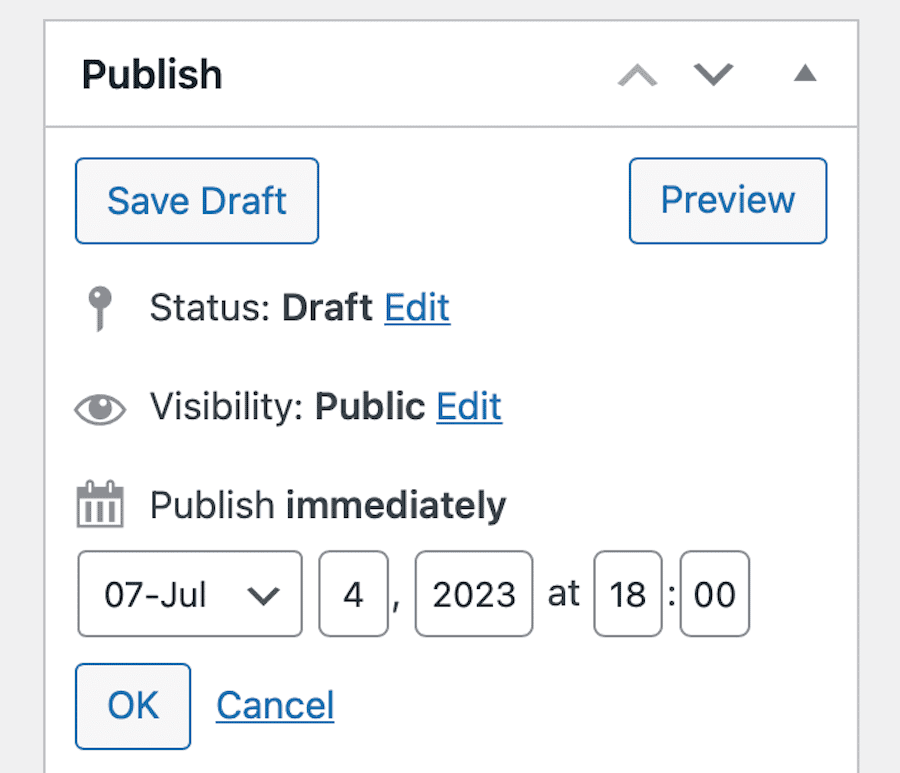
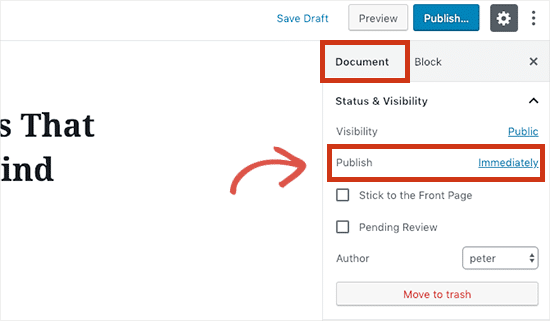
Now, look for the “Publish” box. It is on the right side of the screen. Click on “Edit” next to “Publish immediately.”
| Field | Action |
|---|---|
| Date | Select the date you want the post to go live. |
| Time | Set the time for the post to publish. |
Use the calendar to choose the date. Use the time fields to set the time. Make sure the time is in 24-hour format. For example, 14:00 means 2:00 PM.
5. Schedule The Post
After setting the date and time, click “OK.” Then, click “Schedule.” Your post is now set to publish at the time you chose.
Credit: www.boiseweb.net
Editing a Scheduled Post
Sometimes, you may need to change a scheduled post. Here is how to do it:
1. Go To The Posts List
In the dashboard, click on “Posts.” You will see a list of all your posts. Find the post you want to edit.
2. Edit The Post
Hover over the post title. Click on “Edit.” This will open the post editor. Make the changes you need.
3. Update The Schedule
To change the publish date, go to the “Publish” box. Click “Edit” next to the date and time. Change the date and time as needed. Click “OK,” then click “Schedule” again. Your changes are saved.
Benefits of Scheduling Posts
There are many benefits to scheduling posts:
- You can plan your content ahead of time.
- You can post at the best times for your audience.
- You can maintain a consistent posting schedule.
- You can save time by batching content creation.
Common Issues and Solutions
Sometimes, things can go wrong. Here are some common issues and how to fix them:
1. Post Did Not Publish
Check the date and time settings. Make sure they are correct. Check your website’s time zone settings. Go to “Settings,” then “General.” Make sure the time zone is set correctly.
2. Post Published At The Wrong Time
Check the time zone settings. Make sure the post time is correct. Edit the post and update the schedule if needed.
3. Post Is Missing
Check the post status. Make sure it is set to “Scheduled.” If it is set to “Draft,” it will not publish. Edit the post and set it to “Scheduled.”

Credit: wordpress.com
Tips for Successful Scheduling
Here are some tips to help you schedule posts successfully:
- Plan your content calendar in advance.
- Use a consistent posting schedule.
- Check your time zone settings.
- Review your scheduled posts regularly.
Frequently Asked Questions
How Do I Schedule A Post In WordPress?
To schedule a post, set the desired publish date and time in the “Publish” section.
Can I Edit A Scheduled Post?
Yes, you can edit a scheduled post anytime before it goes live.
Will My Post Publish Automatically?
Yes, WordPress will automatically publish your post at the scheduled time.
Can I Schedule Multiple Posts At Once?
Yes, you can schedule as many posts as you want in WordPress.
Conclusion
Scheduling posts in WordPress is easy. You can also do it with this plugin. It helps you manage your content better. Follow the steps in this guide. You will be able to schedule your posts with no problems. Happy blogging!